Genuino 101 + DHT22 で温度情報をBLEで送る(なんかおかしい)
RaspberryPi 3を買うまでの時間つぶしでGenuino 101を買ったけど、RaspberryPi 3 もう買えるみたい。時間つぶしのはずが目つぶしになっていた。
とりあえず、さっさとBLE使ってみようと言うことで、多めに買っていたDHT22 温度湿度センサの温度情報をBLEで送ってタブレットから見られるようにしてみた。ただ、どうも腑に落ちない部分がある。
Genuino 101の接続
とりあえずGenuino 101の13PinにLEDを直接刺している(よくない)。
DHT22は1Pinが3.3V, 2PinがGenuino 101の12Pin, 3PinはNC, 4PinはGenuino 101のGND。
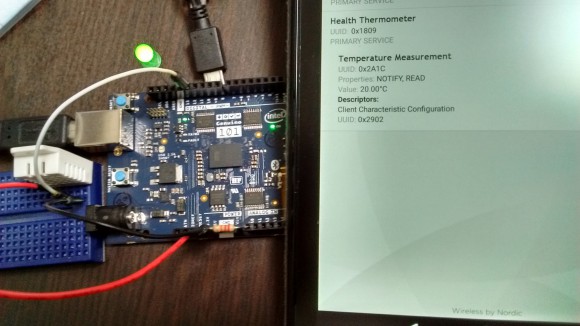
とりあえずタブレットに情報を出した状態が下記写真。
サンプルプログラムのHeart Rate Monitorを試してたときに挿しているA0-GNDの抵抗は無視して欲しい。
Genuino 101のサンプルスケッチ
環境はMacです。
ArduinoのIDE Version 1.6.8に”Tools -> Board -> Boards Manager"で"101"と入れて検索で出てきたのをインストールすればGenuino 101のパッケージが入る。BoardにArduino/Genuino 101を選択。
下記スケッチを描いた。
ベースはDHT22のサンプルプログラム。
ソースを見るとわかるけど、BLEのサービスを指定して、その定義に従った情報を送ってやる必要がある。
BLEのサービスはここを参考に、Health Thermometerをつかった。
Genuino 101のCurieBLEでどうやってFloatの情報を送るのかサンプルには無かったので、困ったが、雰囲気的に、Floatの32bitデータをchar x 4で送っているような感じ。ただ、下記コードだと、どうもFloatのフォーマットじゃない気がする。でも、Androidのアプリからはそれっぽい値が見えている。謎。
// Example testing sketch for various DHT humidity/temperature sensors
// Written by ladyada, public domain

#include "DHT.h"
#include <CurieBLE.h>

#define DHTPIN 12     // DHT22の接続PIN
const int ledPin = 13; // LEDの接続PIN

// Uncomment whatever type you're using!
#define DHTTYPE DHT22   // DHT 22  (AM2302)


// Initialize DHT sensor.
// Note that older versions of this library took an optional third parameter to
// tweak the timings for faster processors.  This parameter is no longer needed
// as the current DHT reading algorithm adjusts itself to work on faster procs.
DHT dht(DHTPIN, DHTTYPE);

BLEPeripheral blePeripheral;
BLEService tempService("1809");  // Health Thermometer Service
BLECharacteristic tempChar("2A1C", BLERead | BLENotify, 5); // Temperature Measurement

void setup() {
  Serial.begin(9600);

  pinMode(ledPin, OUTPUT);

  blePeripheral.setLocalName("TempSketch");
  blePeripheral.setAdvertisedServiceUuid(tempService.uuid());  // add the service UUID
  blePeripheral.addAttribute(tempService);   // Add the BLE Battery service
  blePeripheral.addAttribute(tempChar); // add the battery level characteristic

  blePeripheral.begin();
  dht.begin();
  Serial.println("Bluetooth device active, waiting for connections..."); //出ない
}

void loop() {
  BLECentral central = blePeripheral.central();

  // if a central is connected to peripheral:
  if (central) {
    Serial.print("Connected to central: ");
    // print the central's MAC address:
    Serial.println(central.address());
    // turn on the LED to indicate the connection:
    digitalWrite(ledPin, HIGH);

    // Read temperature as Celsius (the default)
    float t = dht.readTemperature();

    // Check if any reads failed and exit early (to try again).
    if (isnan(t)) {
      Serial.println("Failed to read from DHT sensor!");
      return;
    }

    // 温度の値tをとりあえずintに
    int it = (int)t;

    // vals[1] - vals[4]がFloatのバイナリデータ?
    const unsigned char vals[5] = {0, (char)it, 0, 0, 0};
    tempChar.setValue(vals, 5);

    Serial.print("Temperature: ");
    Serial.println(it);
    // Wait a few seconds between measurements.
    delay(500);
  }
  digitalWrite(ledPin, LOW);
}
Androidアプリで確認
nRF Master Control Panel (BLE)をAndroidのタブレット(Nexus7 2013)に入れて実行。
すでにGenuino 101にスケッチ書いて実行している状態だと、デバイスが見えているはず。
選択し、情報を開いていくと温度情報が出ていた(上の写真)。
もうちょいちゃんとした内容で書きたかった。
